jueves, 19 de noviembre de 2015

CHRISTMAS IS COMING!


Christmas is coming and so is the schools excitement to participate in this amazing time of the year, everybody is looking forward the arrival of Santa Claus to the schools and bring us a present. Al this is for been good students.

There are lots of activities todo do in Christmas time, in this case I have decided to do it this way.

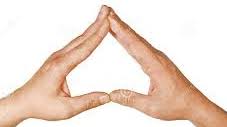
Every kid wants to decorate the christmas three, so I had the idea to create our own Christmas ornament.

It would start by painting the upper palm in red thumb included, then the middle palm in a flesh kid color and the fingers in white. The next step is to take the students hand and tell him or her to place it on a dark colored cardboard. After this we will paint the eyes in black using the other hand and then the same with the tassel. We will wait until its dry and then we'll plasticize it and make a hole on it to pass a string through it and with this we will have our christmas ornament.


Se acerca la navidad y con esto, la ilusión en los colegios por celebrarla, todos esperamos ansiosos que llegue el día en que Papá Noel, hace una pequeña parada en el colegio y nos da un regalito. Todo eso por haber sido unos muy buenos alumnos.

Existen multiples de actividades para trabajar con los niños la Navidad, yo he querido hacerlo de la siguiente manera.

Como todo niño desea montar el árbol de navidad y decorarlo, he pensado que es muy buena idea crear nuestro propio adorno de navidad.

Se pintaría de color Rojo la parte superior de la palma de la mano del alumno, incluyendo el pulgar, el centro de color carne y los cuatro dedos y el trocito de palma que falta de color blanco. Después se pone la mano encima de una cartulina de color oscuro y se deja la huella de la mano. Cuando se ha terminado el procedimiento, le pedimos al alumno que con la otra mano moje el dedito en el color negro y que le haga dos ojos a Papá Noel. Luego hará lo mismo con el color blanco para pintar el pompón del gorro. Lo dejaremos secar, más tarde lo plastificaremos, haremos un agujero para poder meterle un cordel y ya tendremos nuestro adorno de Navidad para colocarlo en el árbol de cada una de sus casas.


lunes, 16 de noviembre de 2015

GINGERBREAD MEN!


Is fundamental for the kids development to work on their smell sense, so they know the difference some odors from others.
A fun way to work this, is experience the sensation of cooking, here we can use foods and themselves can smell and see witch food it is. In necessary that their taste the food before it's cooked.

A Christmas activity, is to live the experience of how to make a biscuit of a Gingerbread man. The children will be the ones to count the tablespoons their are going to need for the recipe and to introduce the foods in the bowl, ones they finish we will continue with the require procedures.

Christmas is coming and is a very important celebration for the children's life, it is a part of the schools life, so our purpose is too show you how to make these common Christmas sweets.

This is the result of the fantastic day that we spent together. The biscuits were very taste and we topped with lacasitos and cream.


Here I put the recipe: (You can change the amounts of the ingredients in your convenience, with this amount of ingredients we have done 50 biscuits)


1 kh of flour
4 Tbsp. ground cinnamon
4 Tbsp. ground ginger
2 Tsp. baking soda
250g og butter
2 cups of sugar
4 Tbsp. milk
8 Tbsp. honey
Lacasitos and cream for decorate it.

In a saucepan, cook the butter, sugar, milk and honey, at low heat until the butter has melted and the sugar has dissolved.

Remove from heat then pour into a mixing bowl and let it cool for a few minutes.
Sift together the flour, cinnamon, ginger and baking soda. Add to the butter mixture and mix until combined.

Flatten the dough onto a cookie sheet lined with parchment paper. Cover with plastic wrap and refrigerate for at least 2 to 3 hours.

Roll the dough.

Cut out shapes and transfer them onto a cookie sheet lined with parchment paper.

Bake at 200 degrees C for 10 minutes, or until golden bronw.  

After been such amazing cooks, we can read or play the story of Gingerbread Man. If you click in the picture below you can watch the video.


Es fundamental para el desarrollo del niño que se trabaje el sentido del olfato, que sepan diferenciar ciertos olores de otros.
Una forma muy divertida de trabajar esto, es experimentar la sensación de lo que es cocinar, aquí podemos utilizar  alimentos y que ellos mismos lo huelan y vean de que alimento se trata.  Es necesario que también lo prueben antes de estar cocinado y después de estarlo.

Una actividad muy navideña,  es la de vivir la experiencia de lo que es hacer un hombre galleta o lo que es más conocido un Gingerbread Man. Los niños serán los que cuenten las cucharadas que necesitan para hacer la receta e introducir los alimentos en el bol, una vez hecho esto tendrán que seguir los procedimientos que requieran. 

Como se está acercando la Navidad, y es una celebración muy importante en la vida del niño, y que se vive mucho en el colegio, vamos a enseñaos como hacer estos dulces tan comunes para dichas fechas.

Este ha sido nuestro resultado del día tan guachi que hemos pasado. Las galletas estaban muy buenas y las decoramos en la clase con lacasitos y nata.


Aquí os dejo la receta: ( Las cantidades las podéis alterar según os convenga, nosotros hemos hecho con esta cantidad unas 50 galletas)

Ingredientes y cantidades:

1 kh de harina
4 cucharadas de Canela
4 cucharadas de Gengibre
2 cucharaditas de Bicarbonato
250g de Mantequilla
2 basos de Azúcar
4 cucharadas de Leche
8 cucharadas de Miel
Lacasitos y nata para decorarlo.

Después de ser unos auténticos cocineros, se les puede contar o poner la historia del Gingerbread Man. Si haces click en la imagen podrás ver el cuento.


viernes, 13 de noviembre de 2015

WE LEARN MATHS WITH GREY COLOR

The grey color is a color that a lot of  nursery children don't know it's english translation, for that  we are going to introduce it by mixing it with the numbers, this way they will rehearse past concepts and unify them with the new ones.

To start we will teach to the kids different animals and things that are grey colored, is important that the language has a visual reinforcement ( Flachcards or Smart board). While I was teaching them the images I shared some comments of the things that were showing up on the illustration. Examples: two grey stones, one grey squirrel y five grey mice.

Here you have a idea of the grey vocabulary you can use of reference: 
Stones, boots, elephant, koala, mouse, cat, dog, clouds, shark, squirrel, seal, dolphin...

Once the kids have a clear idea of what the grey color is, we will develop te activity that has been attached as a video. The purpose of this activity is that the children paint whit one finger 10 little grey dots and then, when dry , draw with a pencil the ears and tail to the little mouses, also while they are painting the dots the children have to count each one of the dots that they are painting.


Before starting the activity, if you please you can play this video and sing the song with the kids, its great fun and they will love it.


El color gris es un color que muchos niños de estas edades desconocen su traducción al inglés, para ello vamos a introducirlo junto con los números, de esta forma repasan conceptos anteriores y los unen con los nuevos.

Para comenzar les enseñaremos a los niños diferentes animales y cosas que son de color gris, es importante que el lenguaje tenga un refuerzo visual (flashcards o PDI). Yo ha medida que les he ido enseñando las imágenes he ido comentado el número de cosas salían en la ilustración. Ejemplos: two grey stones, one grey squirrel y five grey mice.

Para que tengáis una idea os dejo aquí vocabulario que hace referencia al color gris:

Piedras, botas, elefante, koala, ratón, gato, perro, nubes, tiburón, ardilla, foca, delfín...

Una vez que los niños tengan la idea clara de lo que es el color gris, haremos la actividad del video que os he adjuntado. Esta actividad consiste en que los niños  pinten con un dedo 10 puntos grises y que luego, cuando esté seco, con un lápiz, intenten hacerle dos orejas y una cola a los pequeños ratoncitos, a medida que lo hagan deberán ir contando el número de ratones que están pintando.

Antes de hacer la actividad de los ratones, si queréis podéis cantar esta canción con los niños, es divertida y les gusta mucho. 

Haz click en la imagen para ver el video con la canción.

jueves, 5 de noviembre de 2015

SHAPES AND COLORS!

Something very important that must be learnt on Nursery are the basics shapes (Circle, square and triangle)

A good way to introduce the children to the shapes is making the children make the shapes with their hands and saying witch shape are they making, in the case they don't know the name of the figure the teacher will be the one who names it and then the children will repeat what the teacher says.


Once the introduction to the geometric shapes finalizes we will make a display. The children will take the shapes, place them on the display and then they will go over the shapes with different colors. Is important that the teacher asks the child's what figure are they choosing and the color that they are going to use.


This is the result of the display (some shapes have made with the template and the rest without).


Algo muy importante que se debe aprender en la etapa de infantil son las figuras ( Circulo, cuadrado y triángulo)

Una buena formar de introducir las figuras es que ellos las intenten hacer con las manos y vayan diciendo en voz alta la figura que estamos haciendo, si no la saben será la profesora la que la diga, y ellos acto seguido la repetirán.

Una vez finalizado la introducción a las figuras geométricas haremos un mural. Cogerán las figuras, las pondrán encima del mural y las repasaran con diferentes colores. Es importante que a medida que vayan cogiendo los colores se le pregunte que figura tienen y qué color va a usar para repasarla.

Este es el resultado del mural (algunas figuras las han hecho con la plantilla y otras sin ella).


NOTA:  El video lo podeis ver en la primera parte, la que está escrita en inglés.

sábado, 31 de octubre de 2015

HAPPY HALLOWEEN!

Trough all the week we have been working the halloween project at school. Here you have some of the activities that I have been doing with the children so you can see the results of a great celebration, that is very important for a big part of the word.

I picked a big black cardboard and then I cut it down into rectangles, the size of an adult's hand.

The children put it the hand on the cardboard and then I outlined the shape of their little hands with a silver permanent-marker. Afterwards they painted with chalk the ghost and pasted the eyes.

With this activity besides enhancing their fine psychomotor abilities also they review the number two and the white color.


Durante toda la semana hemos trabajado el proyecto de halloween en el colegio. Os dejo aquí, algunas de las actividades que he hecho con los niños para que veáis el resultado de una bonita celebración, que es muy importante para gran parte del mundo.

He cogido una cartulina grande de color negro y luego la he recortado en rectángulos, del tamaño de la mano de un adulto.
Los niños ponían la mano encima de la cartulina y yo con un rotulador de color plata les perfilaba la figura de su pequeña mano. Después con tizas blancas pintaban el fantasmita y le pegaban ojos.

Con esta actividad además de desarrollar la psicomotricidad fina también repasan el número dos y el color blanco.